DIY bamboo float
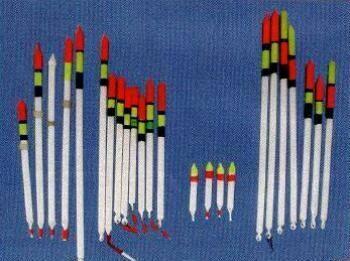
Many anglers prefer homemade floats to purchased ones and want to learn how to make a float with their own hands, rather than buying them in a store. Floats can be made in any shape that you like, as well as painted in your favorite color, which will delight your eye while fishing or which seems less noticeable to the eyes of the fish. This article will tell you how to make a float yourself from various materials at hand and what floats you can make yourself.
How to make a float with your own hands
Making a float for a fishing rod with your own hands is quite simple. Of course, you will spend more time on the first floats and they will not be perfect for you, but then, with each new float, everything will go like clockwork and you yourself can modify them or come up with various new options for homemade floats. So, let's start in order and start making your first homemade float, or perhaps you have already made floats with your own hands, but have already forgotten the whole process or want to learn something new. Well, you have come to the address and today you will receive what you came here for.
What and what kind of float to make
The float can be made from a variety of materials, which should naturally float well in the water. The most affordable, practical, sensitive and suitable materials for making a homemade float are presented in this list:
- goose feather (if you get it, you can use a swan feather);
- plastic tube (from under a balloon, cotton candy or flag);
- Cork;
- wood;
- Styrofoam.
When choosing materials for a float, you need to take into account what kind of fish you will use it on, because homemade floats made of various materials are sensitive to bites. So, for such a medium-sized fish, floats made of a goose feather or a plastic tube are best suited, but for catching a predator, such as or, a float made of foam or cork is more suitable for live bait, which are less sensitive and ideal for powerful and sharp bites of a predator, which will not go unnoticed and at the same time, such floats will be very heavy for live bait and he will not be able to confuse the tackle or take it away from the place of fishing. Although the predator is more often caught. Below I will tell you about making homemade floats from each proposed material.
How to make a feather float

is one of the most sensitive floats. Due to its keel-like shape, it very well conveys even light touches of fish to the bait, which significantly increases the chances of a successful hooking. With such a huge advantage over other floats, this float is not at all difficult to manufacture. Moreover, we can say he is already ready by nature. As they say, all ingenious is simple. This float created by nature only needs to be cleaned of the fluff, leaving only the rod. The rod should be cleaned carefully so as not to damage the integrity and not to violate its water permeability. The easiest way to do this is by singing the fluff over the fire, you can use a simple lighter or matches, or carefully cut it off with a blade, then it is desirable to lightly grind it with a fine sandpaper.
Now you need to come up with a line mount. Here, too, everything is simple - a small rubber ring is put on the lower, thinner part of the feather, usually a nipple is used for this, from which a piece about 5 mm long is cut off and put on the feather. Or, with tape or tape, a wire twisted into a braid or into a ring is attached to the bottom of the float, on which a nipple can then be put on.
Now you can fish on our feather float, threading a line through it and hanging the weight required by weight. One thing remains. The natural color of the feather can be difficult to see on the water, especially when the clouds are reflected on the water and our float merges with their reflection. To observe our float was easy and the eyesight was not strained at the same time, it is necessary to paint its top in a clearly visible color. Usually, for painting the float, a combination of black with orange, red or light green is chosen. The float should be painted with either waterproof paint or any other non-waterproof paint, but then the float should be covered with colorless varnish on top of the paint. You don't have to bother and just take the nail polish from your wife, sister or mother, which is ideal for this procedure.
Now our feather float is scorched, sanded, fitted with a line rubber, painted and ready to go fishing. Making such a homemade float will take you very little time. It is very convenient to make such a float in several pieces at once, and besides, it can be made even in the field, on the shore of a pond, if you are suddenly left on a fishing trip without a float.
How to make a float from a plastic tube
A float made of a plastic tube, which is often used as a holder for a flag, cotton candy or a balloon, is a kind of analogue of a goose feather float, but its shape will be more proportional and even, and the look of such a float is much more aesthetically pleasing. This float is quite durable, you can break it only if you want to, its sensitivity is also at the highest level, and there are no difficulties in manufacturing. In general, a good option for making a homemade float.
So, as I said, this float is very simple to make. We take a plastic tube, measure the length we need,
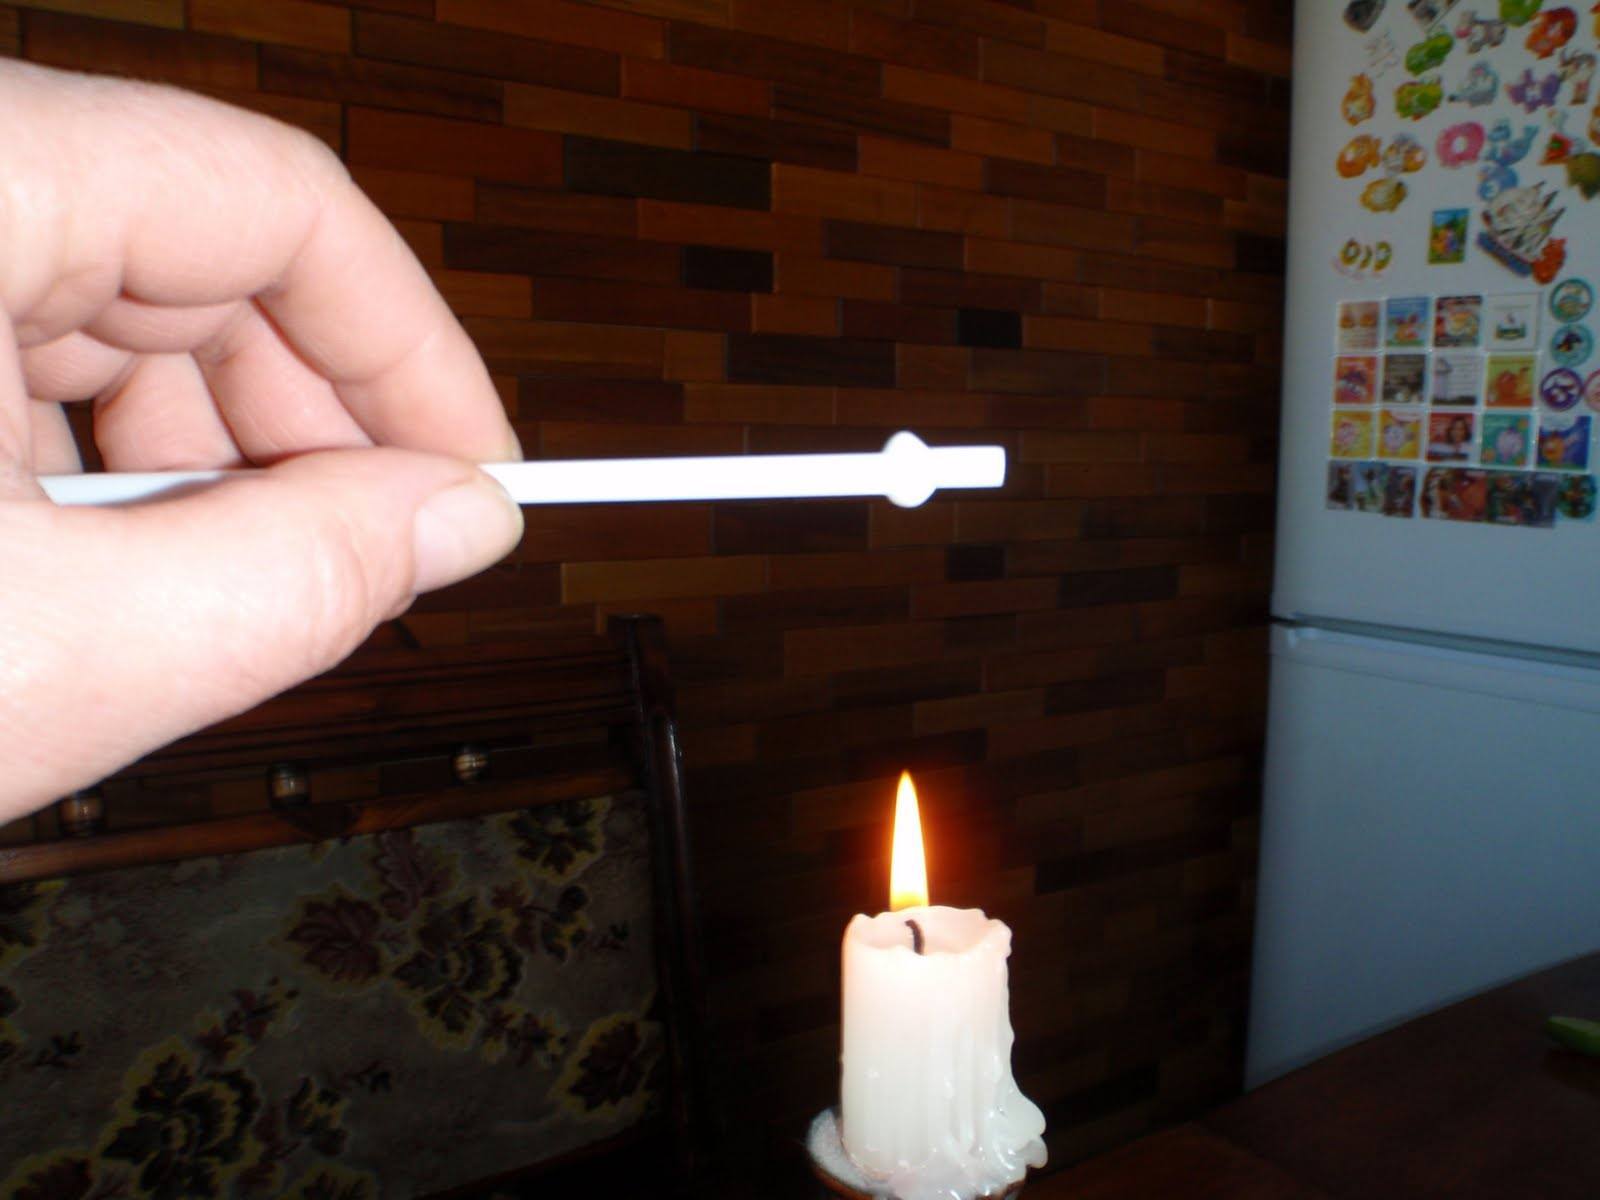
then it is necessary to solder the edges of this tube so that water cannot penetrate inside. To do this, stepping back a little from the edge of the tube, heat it with a lighter, or better with a candle, until it softens and a kind of bubble forms on its surface.
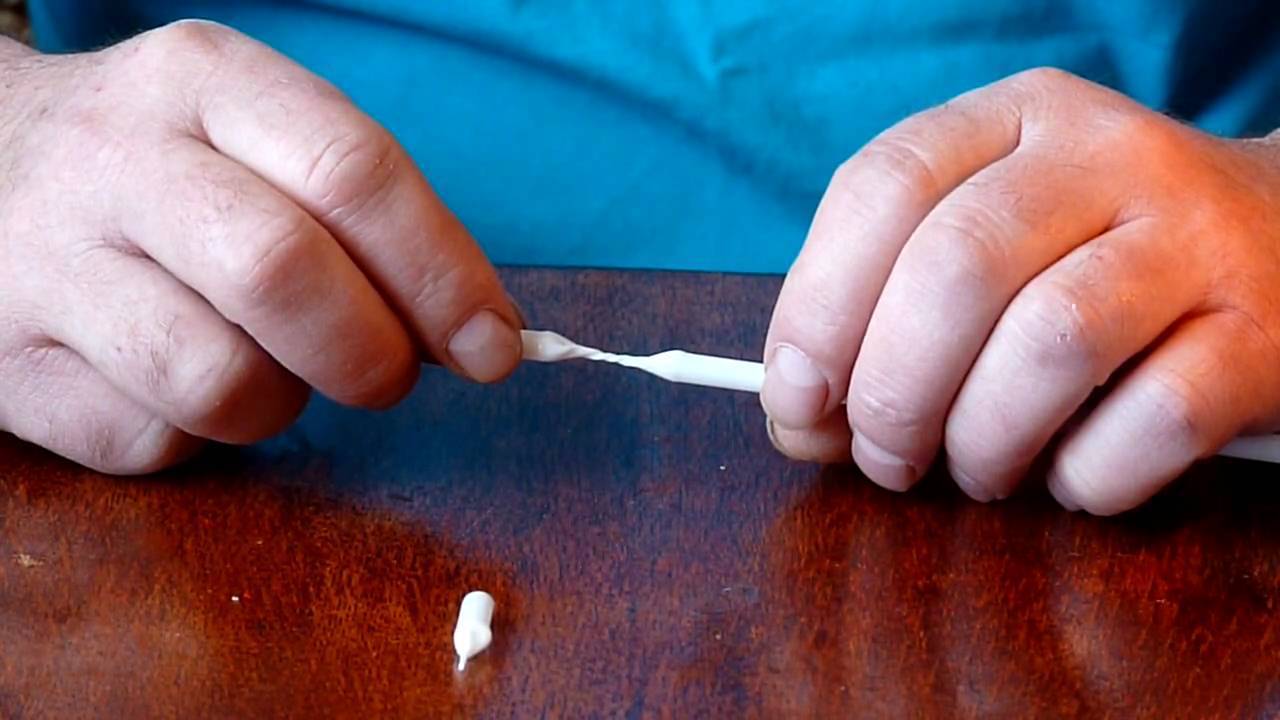
When the plastic tube has softened enough and swelled at the place of heating, we twist it in this place into a kind of pigtail. Let the straw cool and the airtight seal is ready. We do the same on the other side of the tube.
Then, again, we slightly heat any edge of the tube and when it softens, it is necessary to flatten this edge with pliers so that a hole can be made in it for a wire or a lock, on which a nipple is then put on and a fishing line is threaded. The nipple can also be put on the twisted tip of the float itself. Cut off the excess, clean the surface with a sandpaper, paint the float and now it is ready. The product of a float made of a plastic tube, with a certain skill, will take you no more than a few minutes. In an hour, you can make enough of such floats for yourself and your comrades for several seasons.
Video how to make a float from a plastic tube
How to make a homemade cork or Styrofoam float
The principle of making a foam float is the same as a cork float, so I will tell you about their manufacture in one section. These floats are significantly inferior in sensitivity to floats made of feathers and plastic tubes, however, they are excellent for catching fish large enough to sink such a float, as well as for catching a predator. The carrying capacity of such floats is decent, so the live bait will be securely fixed in the right place of fishing, and the bite of the predator will be clearly visible.
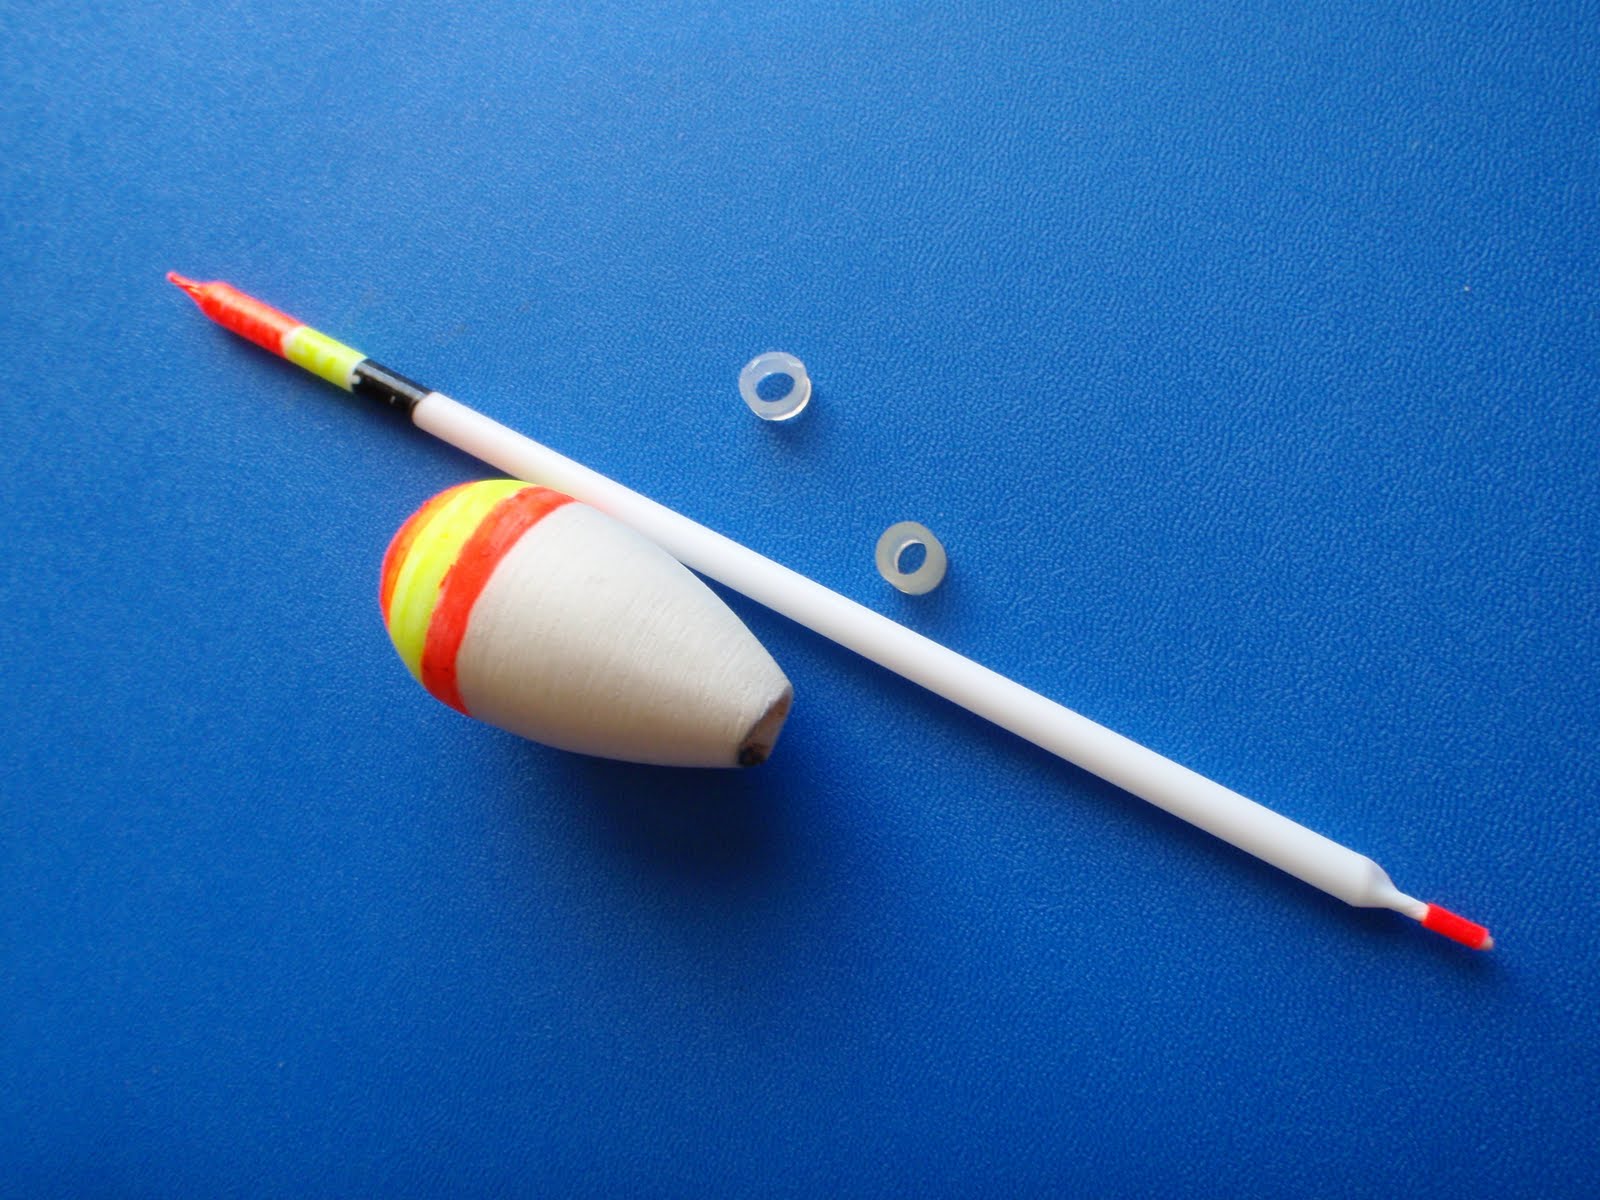
Any angler can make a foam float with his own hands, the technology of its manufacture is quite simple. To make such a float, it is necessary to cut out the necessary shape from foam or wine cork, you can cut out a rough workpiece, and give the shape on a grindstone, a grinder or a drill with an emery nozzle. A rod is pushed through this blank, which can be used as anything, for example, a stick from a chupa-chups, an ampoule from a pen, metal wire, a plastic tube that does not even need to be sealed, since buoyancy is ensured not by the tightness of the tube, but by foam, or stopper, depending on what material you decide to use. And you can also use any other object that is suitable in shape as a rod. We make the attachment for the fishing line from twisted wire, one end of which we put in a tube-rod, and on the other we put on a nipple. As I said above, the nipple can be slipped directly onto the rod. We paint and the float is ready.
Video how to make a foam float
Not a bad, fast, easy and at the same time quite high-quality method of making a homemade foam float. It is enough to have the means at hand. Watching the video.
How to make a wooden float with your own hands
It is quite difficult to make a float out of wood yourself. It is an order of magnitude more complicated than all those floats that we disassembled above. To make floats from wood, certain skills are required and if floats made of foam, cork and feathers can still be made by hand, then it will be much more difficult to do without a tool. The material for a high-quality float made of wood is also unlikely to be lying around in someone's house, since balsa wood is best suited for making a float. You can make a float from bamboo, the floats from it are quite high-quality, but you also have to sweat a little over their manufacture. In more detail, the technology for making bamboo floats is described in the video.
DIY bamboo float
How to make a sliding float with your own hands
Sometimes, it becomes necessary to use a sliding float, this is especially important for long casts or when the depth at the point of fishing exceeds the length of the rod itself. A sliding float is sometimes simply not replaceable for long casting. How can you do it? In fact, there is nothing hard about it.
The essence of the sliding float is that it moves freely along the line, limited to only two stoppers. The upper stopper sets the fishing depth, and the other stopper is designed so that when casting the float moves towards it and does not fall below, towards weights and other equipment. Stoppers can also be made by yourself, but they cost a penny, so I will not bother and tell you how to make stops. You can buy them at every fishing store. The float can be used with any of those that we have already learned to do ourselves. They will differ only in the attachment to the fishing line. And the mount, as you might have guessed, should allow the float to move freely along the line, but at the same time the stopper should not crawl into it. The easiest way is to make a wire eyelet and attach it to the float. Having passed the fishing line into it and having installed the stoppers, we already have a working sliding float. You can learn how to completely form a rig with a sliding float in this video, which describes this process in detail and clearly.
(16
votes, average: 4,75
out of 5)
Special thanks to those who shared in their favorite social network